Wednesday, December 28, 2011

Changing WebSphere Portal 6.1 Profile Path and Name using Graphical Installer

Setting the profile name, and path, while installing WebSphere Portal 6.1 is actually pretty easy, though many people don't even realize that it's possible.

Simply add the profile path, name, and isDefault property to the install.sh command line.  Here's an example:
./install.sh -W detectProfileAction.isDefault="True" -W detectProfileAction.profileName="wp_wcmdev01" -W detectProfileAction.profilePath="/opt/IBM/WebSphere/AppServer/profiles"

The full document from IBM can be found at the following URI.  The article is specific to AIX and SA Portal, but worked fine for me on Linux using an ND configuration as well.

http://publib.boulder.ibm.com/infocenter/wpdoc/v6r1/index.jsp?topic=/com.ibm.wp.ent.doc_v6101/install/stdalone_aix_inst_wp.html

Friday, September 16, 2011

RAFW Control Error: "Current user is not a root user!"

When running IHS under a non-root user context you can run into some strange problems.  In this case, we had properly installed and configured our IBM HTTP Servers under a non-root user and put them under RAFW management some months ago without any issues.

Recently, however, changes to the topology required that we regenerate the RAFW environment tree.  The web servers were discovered and added into the new environment, as expected, but every attempt to start or stop them from RAFW failed with the following error:


/opt/buildforge/rafw/product/lib/jython/ant_jythonLib.xml:341: Current user is not a root user!
There were plenty of lines in the logs telling us that RAFW was connected under our non-root user context, all directory ownership and file level RWX rights were correct, and issuing commands from the local machine worked fine, but this error kept coming back!  It was frustrating and, as is often the case with RAFW and WebSphere, even the mighty Google couldn't help.

Some digging into the product directory eventually led us to the ineptly named value in the install.properties file for each of the IHS node entries in the RAFW environment tree: ALLOW_NON_ROOT_SILENT_INSTALL.  Turns out that this value is not only checked during install, but is also read during other RAFW actions!  We opened each install.properties file (\IBM\BuildForge\rafw\user\environments\prod_env\cells\cell\nodes\ihs01\install.properties in our environment) and set "ALLOW_NON_ROOT_SILENT_INSTALL = true".

BINGO!  The next run went smoothly and the following note was noticed in the logs:

[echo]  Warning: ALLOW_NON_ROOT_SILENT_INSTALL is set to true: skipping root check

Happy RAFWing!

Thursday, August 18, 2011

Installing 32-bit CentOS 5.6 in VirtualBox 4.0 on 64-bit Windows 7

VirtualBox (http://www.virtualbox.org) is a very handy virtualization application that can very quickly get your Virtual Machines up and running and supports a wide variety of environments.  Lately, I have been using it to host various Linux distributions on my Windows 7 machine while I study and experiment with different technologies.

Recently I decided that I wanted to install CentOS 5.6 with the Gnome DWM and ran into a couple of little small issues that are very easy to get around if you know how to handle them.

First, I am using the image CentOS-5.6-i386-bin-DVD and initializing the new VM with the following settings (your settings may be slightly different):


Start the VM and choose the default boot option, which will attempt to load CentOS 5.6 from the mapped DVD drive.   CentOS-5.6-i386-bin-DVD fails to load, hanging on the line: "NET: Registered protocol family 2":


There is an easy workaround for this issue.  Power off the hung VM using the guest window's menu or by closing the window and choosing the "Power Off" option, then go back to the VirtualBox Manager, select the CentOS VM from the list of machines, and click the "Settings" button.  From there, you'll need to select "System" from the list on the left, then check the "Enable IO APIC" box, click the "OK" button, and start your new VM again.


The VirtualBox documentation states that "Enabling the I/O APIC is required for 64-bit guest operating systems", then follows that statement up with "software support for I/O APICs has been unreliable with some operating systems other than Windows". Since we're installing a 32-bit Linux distribution as our guest operating system, enabling I/O APIC does not sound like the right thing to do, but it works.

After the guest operating system is installed, rebooted, and patched it's time to install the VirtualBox Guest Additions.  The VB Guest Additions make the guest OS much more usable by providing a host of features that include better mouse integration, higher screen resolutions, clipboard integration, shared folders, and (my favorite) dynamic screen resizing.  Before the VB Guest Additions can be installed completely, we must first install a couple of prerequisite packages:

  • gcc - The Gnu C Complier
  • kernel-devel - Development package for building kernel modules to match the kernel.

To install gcc and kernel-devel in CentOS 5.6, open a terminal window as root and enter the following commands and answer "y" when asked to confirm the action.
  • yum install kernel-devel
  • yum install gcc
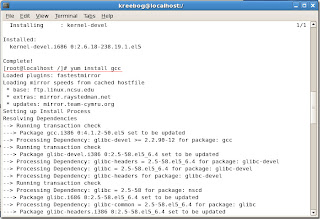
 YUM (Yellow dog Updater Modified) will automatically detect
dependencies and install any prerequisite packages. 
Now that the prerequisites are out of the way, it is safe to install the VirtualBox Guest Additions. From a command prompt enter the following command as root (note that this command will be different if your VB version is not exactly the same as mine): 

/media/VBOXADDITIONS_4.0.12_72916/VBoxLinuxAdditions.run
In some situations it is possible that the kernel-devel package previously installed is not exactly what is required to build the VB Guest Additions module. If that happens, you will see an error message as in the following screenshot.


If this happens, simply copy the line with the correct yum install kernel-devel-* command and run it at the terminal command prompt. This will install the specific version of the kernel development package that the VirtualBox needs in order to build the Guest Additions module.

When the yum installer completes, execute VBoxLinuxAdditions.run again:

/media/VBOXADDITIONS_4.0.12_72916/VBoxLinuxAdditions.run

Watch the screen - all boxes should have a green "OK" in them.

If there are any steps that say "FAILED" then you may need to consult the VirtualBox documentation at http://www.virtualbox.org/wiki/Documentation.

That's it!  Now restart the guest OS, log in, and enjoy!  


Wednesday, April 27, 2011

Propagating WAS 7.0 Plugin to Remote IHS Server

Sometimes it looks like everything is right in the httpd.conf and admin.conf files, but stuff still just doesn't want to work.  Very frustrating and time consuming until you realize that you missed one little step.

If propagating a plugin from WAS 7.0 admin console to an IHS 7.0 server results in the following errors, then you may be simply missing an admin.passwd file. 

These two messages appear in the WAS console and the dmgr SystemOut.log:

PLGC0063E: The propagation of the plug-in configuration file ... on the Web server computer failed.
PLGC0049E: The propagation of the plug-in configuration file failed for the Web server.
... and this one appears in the admin_error.log of your IHS server's logs directory: 

[Wed Apr 27 14:57:15 2011] [error] [client 127.0.0.1] user MyAdmin not found: /wasadmin
Even though all of the user and account names are set correctly in the WAS console and on the target IHS server's various config files, the admin.passwd file is probably missing.  Try setting the admin.passwd file by using the following command (of course, substituting "MyAdmin" for your local account name):

./htpasswd -c /opt/IBM/HTTPServer/conf/admin.passwd MyAdmin
Then restart your admin server using the /HTTPServer/bin/adminctrl stop | start commands, and try to propagate the plugin again.  With any luck, you're in business.

This will create the admin.passwd account in the HTTP Server's conf directory.  Restart the admin server and try the propagation again.... worked for me!

IBM RAFW 7.1.1.2 IHS Plugin Patch Failure - Fix

IBM's Rational Automation Framework for Websphere (RAFW) can save a ton of time and trouble when installing, configuring, or administering IBM WebSphere products, but when things go wrong it can be a massive headache! 

This time around I was attempting to create a new clustered WAS 7.0.0.13 environment with separate nodes running IHS and Plugin (7.0.0.13 as well).  The installs ran fine until it came time to patch up the plugin to 7.0.0.13 / JDK SR8, at which point things went bad.

At first it looked like the patch names were wrong, so I reviewed the patches directory under the RAFW Media tree and made some adjustments to my install.properties files for each of the two IHS nodes I was attempting to install and patch the Plugin to.  Then I ran the steps again, but came up with different errors.  A few more tweaks and I managed to get the right values, but the project still failed on the Install Plugin Nodes steps! 

In case anyone is struggling with the patch lines, here are the valid X_PATCHES values from the IHS Node's install.properties file:


# Patches to apply for each product.
IHS_PATCHES=ihs70_fp13,ihs70_jdk_sr8
PLUGIN_PATCHES=plugin70_fp13,plugin70_jdk_sr8
The error, once the patch lines were sorted out, was:


D:\IBM\BuildForge\rafw\product\actions\install\ihs\common\install_update_ihs_common.xml:176: D:\IBM\BuildForge\rafw\media\linux\X64\ihs\70\patches\@PATCHNAME@ not found.
(our BF/RAFW stack is on a Windows server)
This looked very odd to me, so I dug into the install_update_ihs_common.xml file and back-traced the call to the  install_ihs70.xml file, where I found the offending @PATCHNAME@ in an ANT for loop ... what would we call it?  A typo?  I'm not sure how it got there. 

Anyway, on to the fix.  It was easy - just replace "@PATCHNAME@" with a properly formatted ANT variable (as was done in other places in the script):  "@{PATCHNAME}". 

ORIG: <param name="PATCH_NAME" value="@PATCHNAME@" />
FIXED: <param name="PATCH_NAME" value="@{PATCHNAME}" />

That's it... if it helps anyone, great! 

-Kreebog